https://www.facebook.com/redthreadshed/


Saturday, 26 May 2012

4 little monkeys and how does your garden grow.

Hello fellow bloggers. A day earlier this week as I have sciatica or something and laid up on the sofa for awhile so thought I would show you what's been going on in our little cottage this week.

Not much crafting going on as the weather has been glorious have been out in the garden. Doesn't it lift the spirits sooo much to have a bit of sun and warmth, although it got so hot today I had to come back into the house!

Here are some more little cheeky monkeys that have been made.

                   All sold.
At last the sock pile has gone! (apart from some baby sock bits) These will be the last probably for quite a while. The little blue stripey one is more the same blue as the monkey on the left. They have their little hats and scarfs on even tho we are in the middle of a heat wave, but they look super cute in them. If you would like to purchase one, just email me at the above address.

Now onto the garden. This was the before picture of the veggie garden and here it is now.


The seeds were put in this week so nowt to show yet! Hope they do come up, it's quite a windy spot but we had some good stuff last year. There are runner beans and peas this year as well as other stuff, although the carrots arn't in yet. We had loads last year, they were lovely.

It is quite a large patch, but I've put in some willow whips to act as a wind barrier. These will make the veg patch smaller when they bush out a bit. On the left hand side is a fedge. (a hedge and fence combination) The willows were put in last year and this year were bent over and woven into each other so they will eventually make a dense hedge. This year the rest of the plot had willows stuck into the ground. Next year when they get roots they too will be woven.

Onto the poly tunnel. It is nearly finished, just need the doors fitting. It is like a sauna in there!
It looks a bit empty but the left hand side is full up! At the end are some strawberries, to foil the slugs they are on a bench thingy and an old planter.
Looking up the other way. We got some chicken manure pellets and boy do they make the tunnel whiff! But hope they will soon break down and go into the soil to enrich it. Hope that it will be full of lush plants in the near future. There is a couple of cherry trees in there (my favourite)

So head honcho has been pretty busy, but he knows what keeps me happy, a bit of dirt and manure :0D
Also nearly finished is the summer house. But more of that on another blog.

I will be posting on these link parties
sixsistersstuff
http://www.flamingotoes.com/
http://www.iheartnaptime.net/
http://sistersofthewildwest.blogspot.co.uk/
spot.co.uk/search/label/sew darn crafty
http://www.handymancraftywoman.com/
http://handmadeharbour.blogspot.co.uk/
http://knickoftimeinteriors.blogspot.co.uk/2012/05/knick-of-time-tuesday-36-vintagestyle.htm
http://carolynshomework.blogspot.co.uk/
http://www.finecraftguild.com/party/
michellestastycreations

Sunday, 20 May 2012

Finished green patchwork quilt and crochet coat hangers.

Hello there everybody. This week I have to show the actual finished...yes, finished patchwork quilt. Go me. It's funny how I couldn't wait to get it all done and dusted and then it's hmmm I really miss having that on my lap stitching away at it!
Without further ado here it is;
Taken outside on a breezy, sunny day (yep, I did say sunny!) It's about the same size as my red quilt which fits a double bed but doesn't have much of an overhang.

Purists look away now, cos as you can see it's rather wonky, but after doing the whole lot by hand my eyes were begining to cross! I was going to leave the green sashing plain, but added the circles which made it all come together very nicely. Before I wasn't liking it much but now I do.

Wrapped around my shy model who said it was nice and cosy! This is a medium weight quilt. Am now thinking what quilt to make next, after me thinking never again. :0D I gave it a quick wash and a cool iron on the reverse side which is a plain white sheet.

I also did some crocheting, which was quite easy to do, but I thought very effective and pretty.
The top one was crochet with cotton from Penny's cotton club (no relation to me!) http://planetpenny.co.uk/ and the bottom one was crochet with odds and ends of acrylic that was in my stash of yarn.
My jacket and coat have never looked so posh! Arn't they so pretty with the flowers dangling down. The pattern can be found on this lady's blog marmaladerose. I found 2 hangers made from wood (one slightly bigger than the other) hiding in my wardrobe. I will have to have a root through the families cupboards and see if I can find some more so I can crochet some pretty flowers to hide the boring wood!

This blog will be joining up with these link parties;
handmadeharbour
http://www.flamingotoes.com/
http://www.iheartnaptime.net/
http://www.homemakeronadime.com/
watchoutmarthaparty
http://sistersofthewildwest.blogspot.co.uk/
http://www.michellestastycreations.blogspot.co.uk/

Sunday, 13 May 2012

Teeny Tiny Chappies/fancy pins and lemon curd.

It's been a funny old week here in my little cottage, yes, I'm talking about the weather. (well we are famous for yakking on about it!) We did get some sunny spells but the wind had a big chill in it and not good for us fair weather gardeners so planting the seeds is still on hold as today is grim, I can hear the wind whistling through the door.....so lets crank up the fire, pull up a chair and have a looksee at what I've been upto this week.

These two incy, wincy monkeys (yes back to them again) were made from cut-up left over baby socks, they have been in a bag for over a year and I was going to throw them out but thought I might be able to get a couple more tinies out of them, and here they are.
Little Joey and Petronella. They are currently residing on my dresser with the jugs and other bits.
It so that you can see the scale of them a bit better. I did say they were small!


Not to be out photographed here is their mate, diddy Charlie Cherry a sweet little thing with his big ears and floppy hat! (Why do monkey's legs always look so large in photos? I try taking them at different angles but the legs always look like they are out of proportion to the body)
For some reason he looks a bit worried, maybe its because he's sitting ontop of my cold freezer :0D

Here is a picture of some pins that I made to go on top of the cactus pincushions in last weeks blog post.
 They are very easy to make if you want to jazz up your pincushion a bit. I used some long quilting pins and some heart pins that were free in a mag. sometime ago. Just put a tiny bit of glue on the stick and thread the beading through and hey presto! (I had to hand a broken pearl and a blue necklace with some bits of metal coloured spacers) I'm sure you could add charms and other items as well.

Last but not least, my other make of the week is some lemon curd. I found 2 lemons that I had forgotten about so had to make something with them before they went off.
Yummy on a piece of toast. I had used spreading 'butter' before, but I did have some proper butter so this time I used that and it's set better. I also used 2 duck eggs which were very orangey in colour (lady opposite keeps ducks and gives me some whenever she has too many) which added an extra lemony colour.  Unlike the ones in the shop that are full of colours,/preservatives etc.

I used the dish over hot water method, as you dont get horrible burnt bits in it and also no cleaning of a yukky saucepan and you can go away and do other jobs just stirring now and then. I have also tried doing this in a microwave and it tastes metally for some reason, it must do something to the acid in the lemons.....I guess? The saucepan way is quicker but for the above reasons slower is sometimes better!

If you are interested in the recipe its;
Grated rind and juice of 2 large lemons
8 oz sugar
2 eggs
4 oz butter

Put saucepan of water on to boil, and then turn down to a simmer, and put a heat proof dish ontop into which put the sugar/butter/lemon bits and wait for the sugar to dissolve and butter to melt...it takes some time so dont get impatient! When thats all melted add the very,very well beaten eggs. (when I crack them open I take out the attached stringy bit)
Give it a jolly good stir when you pour the egg in so it mixes together well. Leave it to do its thing giving a good stir now and again. It will be ready when the back of the spoon gets a good coat of mixture on it. Pour into sterilized jam jars and leave overnight to set. Just in time for breakfast!

(Even tho the eggs are given a good beating I find that there are some small white eggy bits do sometimes appear in the mixture. If anybody knows why this happens I would love to know. I just fish them out, it doesnt affect the taste at all and really I'm just being pernickity!)

I will be adding to these linky parties
http://www.1stuniquegifts.co.uk/blog/
http://www.flamingotoes.com/
http://www.iheartnaptime.net/
http://www.homemakeronadime.com/
http://sistersofthewildwest.blogspot.co.uk/
http://www.sixsistersstuff.com/
http://sewmanyways.blogspot.com
handymancraftywoman
michellestastycreations
thewellcraftedhome.
http://my-crowded-kitchen.blogspot.co.uk/
sixsistersstuff


Sunday, 6 May 2012

2 Cheeky Chappies and a field of cacti.

Another week has flown past and here is my Sunday update of some things that have been made here in my little Highland Cottage.

There hasn't been a post with any monkeys in lately so can't have that!
Here are 2 little sock monkeys that are so bright and cheerful and very cute.
 Bright red/orange Oswald and his little friend, Bluey. These are made with kiddies socks and have felt eyes so are more little kiddie friendly than my larger ones which have button eyes.

Although we have had a severe shortage of the sun, look what I have been growing.....a field of cacti!!
Good job they need neither the sun or water so stress free growing. :0D
I have learnt how to make pin toppers (if that's what they are called) to fancy up a pin cushion. I didn't think to take a seperate photo so you can't see them to well. But basically it's an extra long pin and then glue beads from various broken necklaces and I have to say it looks very effective.
Head Honcho made a little tray for them to stand in so they look like they're from a garden centre!

I'm still plodding on with hand quilting my quilt as I've added an extra pattern to the sashing.

Let's hope we will have some good weather very soon, or my seeds will start to sprout in the packet.  I've made some green covers out of some water bottles (didnt have any clear ones so I hope that's OK) for some lettuces that are in desperate need to go in the ground as they have outgrown their container. But at the moment the wind is very chilly and it doesn't make me want to leave the warmth to go out and dig. (I'm a very fair weather gardener!)

Here are the linky parties that I will be adding to over the week.
handmade Monday
http://www.flamingotoes.com/
http://www.niftythriftythings.com/
http://www.iheartnaptime.net/
http://sewmanyways.blogspot.co.uk/search/label/sew%20darn%20crafty
http://www.twiggstudios.com/2012/05/sunday-show-off-linky-party.html
http://www.sixsistersstuff.com/
http://www.craftjunkietoo.com/search/label/T.G.I.F.%20Linky%20Party
martha-monday-link-up-party
coastal charm
sassysites.blogspot.co.uk/
http://micheleravendesigns.blogspot.co.uk/
http://www.michellestastycreations.blogspot.co.uk/

Sunday, 29 April 2012

Lovey Dovey Birdies.

Well Sunday has rolled around again and this weeks makes consist of some love birds. Here they are waiting patiently for me to finish them.


The back with their little cute red buttons. The two on the right are made from linen and love heart red fabric. They are for my d.i.l. and the other two are calico and left over material from my red quilt so they are destined for my bedroom.


Just hanging around.....

Hmmm maybe they need something a little bit extra.....
So now they have a beak full of hearts instead of worms!

I finally finished the cushion with an extra monogram for d.i.l and son

                                             Finished cushion, it does look like there is an abstract line running through the middle but the patchwork is padded out and is part of the quilted look that I've sewn onto it.

Back to finishing off a field of cactus/cacti that I'm making. So cheerio till next week.

Will be putting this on these linky parties:
http://www.1stuniquegifts.co.uk/blog/
http://www.flamingotoes.com/
http://www.homemakeronadime.com/
http://sewmanyways.blogspot.co.uk/search/label/sew%20darn%20crafty
http://sewchatty.blogspot.co.uk/
http://www.craftskeepmesane.blogspot.co.uk/
http://thecreativeitchboutique.blogspot.co.uk/
http://linda-coastalcharm.blogspot.co.uk/
http://www.elizabethandco.blogspot.co.uk/
http://sewmanyways.blogspot.co.uk/search/label/sew%20darn%20crafty
http://www.finecraftguild.com/party/
http://www.michellestastycreations.blogspot.co.uk/

Sunday, 22 April 2012

 So how does your garden grow......

This is something that I've been upto this week. Catus that you don't need to water.....ever!
The red spotty flower pot on the left was made from a little bowl, which came with an Andrex puppy years ago and the top part is a deodrant top. (I know I have some strange bits and pieces stashed around the cottage!)I glue the fabric to the bottom first and then covered the deodrant cap with the fabric, then glued them both together and tied some raffia around to cover the join.
The other two flower pots were nicked from Head Honcho's shed and are those little peat/cardboard containers for seedlings. Painted and with a spotty dot are just the ticket.

The tinsy, bitsy, tiny catus was my practise piece, and I used a bottle cap from a drink which then was covered in some fabric and raffia. This one measures 2 and half inches and the others are nearly 6".
Stuck some pins in there you have it, useful and decorative at the same time!

This lime green catus, which has cherry fabric flowers, (yes strange I know but then you can do anything ya like when you're making it!!) sits nicely in amongst my little dresser collection. (Wonders where can I squeeze in a nice big dresser in my little cottage as it's getting a bit full)

Even tho these pictures were taken with my super duper new camer, the colours still don't seem to come out nice and bright.....unless it's my computer screen, or could it be my photographing skills!

I will be popping this onto handmade monday and/
http://iamonly1woman.blogspot.com.ar/
http://www.niftythriftythings.com/
show off monday
http://www.sweetlittlegals.com/
http://linda-coastalcharm.blogspot.co.uk/
http://jannolson.blogspot.co.uk/
http://joyfulstamper.blogspot.co.uk/search/label/Inspire%20Me%20Fridays
http://www.bedifferentactnormal.com/2012/04/show-and-tell-saturday-042812.html
hungryhypo.blogspot


Forgot to add that you can see all sorts of different ways of making cactus if you google catus images, and then let your imagination rip :0D

Sunday, 15 April 2012

Mongrammes and tea tidy

I have always liked monogrammes, especially the posh intertwinned white/cream on linen. Here is my first one. I hope to make something for my d.i.l. with it. I used 1 strand of Anchor thread on linen. I wonder if it's a tad to dark?
This is the start;
Finished 'T'
I did realise to late that the rose in the middle of the T is more or less the same red as the T so it doesn't stand out as well.

Here is a close up;
For some reason the T looks a tad wonky but in real life it's straight!
 The white strands are ordinary sewing cotton (as I couldn't be bothered to get up and used what was beside me in my sewing box!) but I think it looks OK. I do a have some 'proper' silk threads which I might have a practise with on something else. Got to finish this one first!

On a completely different note here is a Spotty cat. I commissioned him from a lady on a craft forum I frequent who does pottery. www.clairemanwani.com I wanted something that goes in with the rest of my kitchen and to replace the dull manky brown tea bag holder that I had.

Look at his sweet face and blue eyes, and here he is with a tea bag (Scottish blend of course :0P )

The photo doesn't do him the justice he deserves. Why does red never photograph properly? Gotta go and have a cuppa!

handmade Monday and also http://iamonly1woman.blogspot.com.ar/ and http://sewmanyways.blogspot.co.uk/ and http://www.handymancraftywoman.com/ has once more come around with lots of crafty blogs.

Thursday, 12 April 2012

Gerald Goth/Biker

And here he is, Gerald Biker Bunny haha.
He was influenced by his dad's friend and fellow biker, Barry, shown here
But as he is only young his mum wont let him go the whole hog and is only letting him have a nose ring, earing and necklace!

And here he is showing you his little secret heart.
This little rabbit has got a black aran sweater on and sports some little whiskers. The ring is on his little pink nose. He has a saucy little smile.

Gerald has been knitted with some hairy wool, which I don't know what it is. (could be a sort of mohair) Tis very hairy anyway, so hairy in fact that I had to give him a haircut. Daughter found the ball in a charity shop and thought, lovely, mum would just want that! (mum didn't, it was hard to knit with. and I thought I'd finished with rabbits for a wee while!)

Anyway hope your like Gerald, he's not as black as his knitted!!

Starting to do a little embroidery now and regret selling off all my old embroidery books when we moved, as they had lots of good references for different stitches.

I have popped this onto  http://www.handymancraftywoman.com/ blog and also
sewmanyways

Friday, 6 April 2012

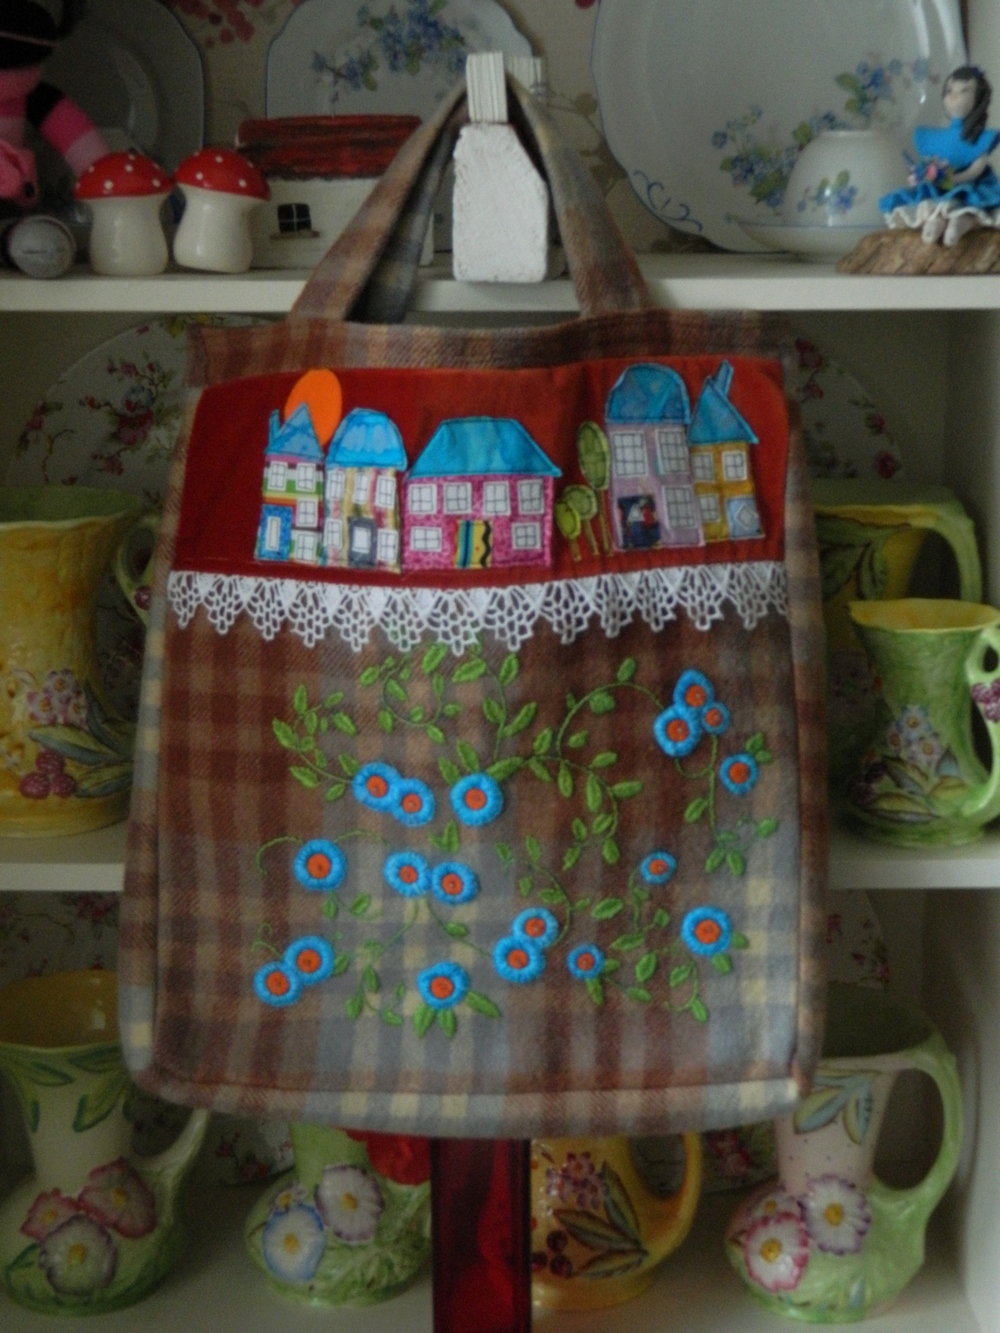
New shopping Bag

Tahdah... I can go shopping now I have a new bag! There isn't a pattern I just cut and hoped for the best. I did come unstuck with that method as, even tho it was measured ever so carefully, one side was larger than the other! Nearly gave up then I can tell you, but we are a tenacious lot in our house and had a light bulb moment and added an extra bit of material around the top of the orange velvet which I think looks OK.

Back view which I've left plain in case I get so many bargains the bag gets to heavy to carry and Head Honcho has to carry it!!  (All tho he really likes it, he's said that no way is he ever going to carry it anywhere :0D )


 This is the inside. Made from a skirt that was in the Tesco sale. Didn't see until it was home that it had lots of seams in it so not the huge piece of fabric that I wanted. Never mind it's done the job. There is a little side pocket for bits and pieces.


                            Close up of the Quirky Houses. I really like the blue                                 roofs against the orange velvet.


     The free hand embroidery. The green leaves and stems took one and three quarters skeins of anchor thread. Three strands were used through out.


Since taking the above photos I've stitched down the lace with a tiny stitch at each point as for some reason they kept rolling over.
So there ya go, finished! Nice and bright and zany, just my cup of tea. Made from a wool blanket and some velvet which were already in my stash. If you spot me in Tesco's with my bag, come up and say Hello!

Here is a linky to Wendy's Handmade Monday blogspot.

Sunday, 1 April 2012

Slowly, slowly.

As the title suggests its a slow slog. I am quite disappointed at myself that the quilt went awry. I think I should have starched the sashing so it was a firmer fabric instead of being quite thin and floppy. I also had enough backing (sheet) fabric so why did I cut it to short not only that but strangly a square was also cut out (not sure how that happened) so had to patch it up. That wasn't the end tho.....there is some cobbled as well.... sigh. Still I bet you wouldn't have noticed if I didn't point it all out haha.
The circles in the sashing are part of the hand quilting, thought I would try them. I have drawn it with my trusty blue marker which washes out (I have used it with the straight stitches as well)
I also am not to excited with the binding either. double sigh.
My little Quirky house patch that I've sewn on which also hides a hole..triple sigh...and on the right you might just see a pin sticking out which is where the patch needs to go ontop of the patch that I've already put in which also wasn't big enough....quardraple sigh!!!!

Still whilst that is on one side for the moment, this is an update on the shopping bag.
                                             Bright and zany eh!


And here is a closer view. The orange is felt attached to the blue material with a buttonhole stitch, a little blue seed bead added. Then with 3 strands of bright blue embroidery thread I buttonholed over the top of the blue material and it's given it a raised effect. There needs to be a bit more greenery to balance it all out, and then it might get stitched together.

And as one project is nearly finished another 6 start up!! Here is one of them, more bits of wood from the wood pile!

Be interesting to see if they can turn into something interesting.

Once again I'm linking up with  handmade Monday

Friday, 30 March 2012

update on bag

Made a little bit of progress on my shopping bag. I think this stitch is called fly stitch, which, apart from leaves, could also be used for feathery bird's wings. I have used 3 strands of anchor embroidery floss.
                                                  

                                                 Close up
Nowhere finished yet. But since this photo I have sewn some flowers on in bright blue and orange.
 

We had a lovely few sunny days but overnight it suddenly went cold and windy...so back to normal now :0( Still it was enjoyable whilst it lasted and the birdies were very chirpy and spring like!