

Thursday, 28 July 2011
Cock-a-doodle-doo


Tuesday, 26 July 2011
Back again
Here I am back....but nothing to show you just yet! I have started on the big cross stitch flower picture. I have started with the background first this time around, which, although boring, at least I can keep an eye on the TV at the same time!
Wednesday, 13 July 2011
Some photos
As I'm going to be away from my computer for a while here is some of my favourite photos that you might like to see while I'm gone.
My made over bookcase which used to be a mahogony brown and now houses my craft items and books. It's amazing how much you can squash into it. Best thing of all it was free as it was being thrown out!


Well that's all folks for a wee while see ya later.
My made over bookcase which used to be a mahogony brown and now houses my craft items and books. It's amazing how much you can squash into it. Best thing of all it was free as it was being thrown out!


Large 'Quirky Village' picture


Well that's all folks for a wee while see ya later.


Monday, 11 July 2011
If in doubt don't mess about!
anyway I watercoloured some pansies but was unhappy with the format and so started to mess about...big mistake!!
Firstly I cut around the picture and then machined it to some wallpaper and a piece of fabric to get a 3d effect. In real life I have to say it looks pretty rough and I wished I'd left well alone. Sometimes it's best to leave something your not happy with and go back months/years after and often it is better for leaving and it's seen with new eyes. (the photo does it more justice than it deserves)!
Or maybe I will put this away for sometime and maybe see it with new eyes....now there's a thought :0D

Friday, 8 July 2011
Another cushion....maybe!
This was started last winter. I had a clear idea in my head how it should be, but of course it didn't turn out that way! Not sure where I'm going to go with it either. Some of it has already been stitched down and the rest I'm still playing with. Maybe when all the flowers are done, to machine stitch the white bits that are on show so it has a quilty look. But this time to put a bit of layering inbetween the fabric so that it's more puffy.
 I keep going back to it and tweeking but at the mo the garden is still pulling me outside.

Wednesday, 6 July 2011
finished cushion
Finished the cushion for my bed. Think it looks a bit lonely! I have 3/4 more to go.

 Not too sure whether there is too much gingham going on, maybe it would look better with some sashing to break it up a bit.


Tuesday, 5 July 2011
Start of cushion
Thought I would have a break from the garden for a couple of hours to start on this cushion which has been sitting on the sewing machine for a while. It's to match the quilt that I made recently, so I hope that it comes together OK.
 The little houses are hand sewn, something that I enjoy doing as you can watch TV at same time!

Saturday, 2 July 2011
Hmmm not quite right.
Well my little crafting buddies here is something that didn't go to plan!
 This was going to be a cushion cover to put on my bed. The red is handstitched on doubled over material.
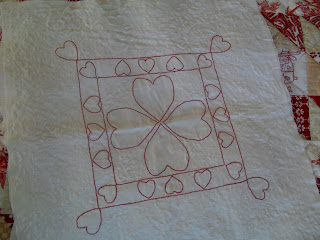 What looks like lots of creases is my attempt at free stitching on the sewing machine!
 I think where I went wrong is that it should have some wadding inbetween the material so that it's more puffy (IYSWIM) and maybe the stitching would have stood out better. The thing is I really enjoyed doing the free stitching so was really disappointed that it is a flop! It's going to be put away for the winter where I will have more time to hum and ha over it and see if it can be salvaged.
 I recently won these mags on a giveaway. How nice was that. They are from The Balancing Kiwi who's blog I frequent. It was nice to sit down with a cuppa and have a browse and see what others are upto in the sewing world and how cute is that puffin. So thanks again for them.


Friday, 1 July 2011
Garden pictures
I can't believe how quickly this month has shot by and I havn't blogged for a while but while I have been in the garden I lost my crafty mojo. But gardening is kind of crafting don't you think?
If your not a fan of dirt and green stuff look away now!
 This is one of the vegetable gardens with carrots, onions. There is a few parsnips, lettuce and cauliflower residing in there as well, but I wanted to see where they grow the best so have a few dotted around the place (even in the flower garden).
 This is going to be the fruit garden. The bushes at the back is just part of the blackcurrants that we have in abundance. They have fruited exactly 1 month earlier than usual which is strange and there is absolutely loads of them.
 This is the next bit of the veggie patch. There will be 4 parts all together in a row.

Work gets in the way of finishing the poly tunnel so all the toms/peppers etc are all squashed up in the porch but they seem to be thriving. It's the first time that we have had some strawberries which havn't been munched by birds/slugs and that's because we bought a cold frame from Llidls and they fit snuggly in there for the moment. We are really impressed with it, went back for another one and they'd sold out.
 This photo was taken from the bottom of the field, looking up towards all the activity. Head Honcho (Hubs) didnt get around to mowing it before it grew really long so we got hay. The neighbour was delighted to get it for his horse. I told hubs not to let it get like that again cos it was such hard work raking it up! All we needed was some cider and ploughman's lunch and it would look like a picture from the early farming days!! Head Honcho has planted quite a few trees in the field which are coming along nicely.
 The bubbling brook at the bottom of the field. Don't be deceived by the small stream it turns into a raging torrent in the right conditions.

Part of our little flower garden around the front which is a lovely sun trap and a nice spot to sit with an ice cream.
Well I hope you enjoyed the mini tour around our little cottage garden and perhaps I will show you a craft made inside before too long.....but while the weather is nice you know where I will be :0)
If your not a fan of dirt and green stuff look away now!


Work gets in the way of finishing the poly tunnel so all the toms/peppers etc are all squashed up in the porch but they seem to be thriving. It's the first time that we have had some strawberries which havn't been munched by birds/slugs and that's because we bought a cold frame from Llidls and they fit snuggly in there for the moment. We are really impressed with it, went back for another one and they'd sold out.


Part of our little flower garden around the front which is a lovely sun trap and a nice spot to sit with an ice cream.
Well I hope you enjoyed the mini tour around our little cottage garden and perhaps I will show you a craft made inside before too long.....but while the weather is nice you know where I will be :0)
Friday, 24 June 2011
Mr.&Mrs Mousey
Havn't been doing any crafty work these last couple of weeks, the garden has taken priority what with weeds an all. So here is Mr & Mrs Mousey that reside on the top of the wardrobe. They were made a loonngg time ago and unfortunately the pattern for them and their clothes have disappeared into oblivion. I suppose they could also be bunny rabbits....but they're not they have long thin tails!
 He's got his work dungarees on and she has her pearl necklace ready for a posh night out!

Sunday, 19 June 2011
I wish I could do woodwork!
Once upon a time (about 38yrs ago) I made a little stool held together with nails. Was quite proud of it (even tho the legs were uneven) till my bro-in-law sat on it and they both collapsed! Since then never tried anything again which requires wood,saws, measurements and nails all together!
We have plenty of room in our back garden (field) for our polytunnel and even tho it's not finished, although progressed a little bit, I have wonderful plans for making a wooden potting shed next door to it so we can put all the gardening bits and pieces in it, which, at the moment is in our large garage but means if you forget something it's a bind (lazy) going and getting it.
We have a large wood pile of branches and other stuff put by thinking it will come in useful someday and thought maybe we can incorporate it into a shed. Well it's the start of a plan! :0D Think this wont be anytime soon tho. But I'm going to cut pictures out of mags for inspiration and stick to the freezer to keep the motivation going. This is bearing in mind it wont be me making it....but hubs haha. Even want a little picket fence and garden around it.....is that going to far?! (I could hand the nails and saw up to him tho) :0D
Here is a p.s. I thought I'd show you a picture of the doodle that I was trying to explain to long suffering hubs about the above idea. I thought he had put my well drawn design in the bin but as he has stuck it on the cupboard door, we just might have a project for next year....yippee.....although I do hope it doesn't come out anything like my scrawl :0D

Saturday, 18 June 2011
Cardigan finished
After a bit of faffing managed to get the collar of the cardigan done. I think it was because I don't usually cast of the back of the collar but keep these stitches on a holder, whereas the pattern said to cast off all 64 stitches. With a bit of dividing etc I still kept the back of the cardi for the collar on a spare needle and cast of the end shoulders. (but there were still two stitches short as the front shoulders had 18 stitches and the backs either side 17!)I don't know why some patterns cast of for the collar as it leaves a lumpy line all the way along so I've always kept these stitches on a spare needle and then instead of picking up stitches they are all ready to be knitted. (I hope you understand all that!!)
Anyway here is the finished product. It looks nicer in real life. The things I would change would be having buttons all the way down and the hem which I think looks to bulky for aran knitting and so I would do either a cable to match or rib so it looks neater.
 It looks a lot nicer in real life.
Collar detail (with the added brooch)
 It will be put away for the winter.
I was given a huugge bottle green aran cardigan which is unused and doesn't fit anybody. So I thought that it could be unravelled and re-knitted into a smaller size. Does anybody know how to effectively get the crinkles out when it's been wound into shanks or balls?
Now to think of the next project which might be the rather large cross stitch as I have sorted out the threads onto spools but there it ended!
Anyway here is the finished product. It looks nicer in real life. The things I would change would be having buttons all the way down and the hem which I think looks to bulky for aran knitting and so I would do either a cable to match or rib so it looks neater.

Collar detail (with the added brooch)

I was given a huugge bottle green aran cardigan which is unused and doesn't fit anybody. So I thought that it could be unravelled and re-knitted into a smaller size. Does anybody know how to effectively get the crinkles out when it's been wound into shanks or balls?
Now to think of the next project which might be the rather large cross stitch as I have sorted out the threads onto spools but there it ended!
Wednesday, 15 June 2011
Putting the bits together
Hello my lovies. Been madly knitting this cardigan and all the pieces are ready for putting together. It is a nice oatmeal colour with flecks in it.
 As you can see it has a bit of aran in it but not much. BUT it seems that the wording for the back neck is wrong! Been left with 64 stitches instead of 32. There is no casting off for the shoulder shaping. I have read and re-read and then read again but it's definitely the pattern and not me. So that's a big nuisance, as I will have to figure out whats what. That's a job for tomorrow now.
Why do the wool manufacturers always do such huge balls of aran? As the second ball of 400g is usually only either a quarter or half used. (yes I do know the answer!!)

Why do the wool manufacturers always do such huge balls of aran? As the second ball of 400g is usually only either a quarter or half used. (yes I do know the answer!!)
Saturday, 11 June 2011
Knitting patterns
Why do some patterns in the instructions for measurements say for example knits to a 34" but then says real size 36" or 38" I dont want to knit it so it's swamps me but thereagain don't want it to come up too small either!
I am halfway through knitting an aran cardigan with a bit of cabling in it so I hope the next picture will be the finished peices, it's knitting up quite quickly which is good cos when I got everything I had the knitting mojo which is slowly disappearing for some reason!
I am halfway through knitting an aran cardigan with a bit of cabling in it so I hope the next picture will be the finished peices, it's knitting up quite quickly which is good cos when I got everything I had the knitting mojo which is slowly disappearing for some reason!
Tuesday, 7 June 2011
Another Quirky Village.
Well me ducks, here is the finished picture of another 'Quirky Village'.

and some close ups


 Tis sightly brighter in real life.
The weather at the little cottage has turned back to windy and dismal. Hope the caulis and lettuce that were put into the ground a couple of days ago will survive OK. Everything else seems to be growing, and I found out why the runner beans turned a yellowy colour as when they were planted they were nice and green . Apparently it's to do with nitrogen in the soil (or lack of it) and it takes a little while for them to re-adjust. But they are still growing and the slugs havn't eaten them!!

and some close ups


The weather at the little cottage has turned back to windy and dismal. Hope the caulis and lettuce that were put into the ground a couple of days ago will survive OK. Everything else seems to be growing, and I found out why the runner beans turned a yellowy colour as when they were planted they were nice and green . Apparently it's to do with nitrogen in the soil (or lack of it) and it takes a little while for them to re-adjust. But they are still growing and the slugs havn't eaten them!!
Saturday, 4 June 2011
book mark
Thank goodness it looks like my camera has dried out and is taking pictures once more. (hope it lasts)
Although not much crafty work going on at this little cottage....because at last we have sun, yep indeedy. Monday it was a very dismal 8c. Friday was the hottest at 28c! (also no wind or breezes) 3 days so far with sun and no wind, rain, overcast skies and so the best place to be is out in the garden, weeding, sowing, planting and planning.
But here is the book mark I was making, although it hasn't quite turned out how I expected, it better than tearing little bits of paper off for a marker (or horror of horror turning the top of page over!!)

Tuesday, 31 May 2011
archaeological dig
When hubs was digging the holes (12 of them) which were each 3 feet deep, we felt that we would find some evidence of an old Scottish settlement like they do in Time Team. A gold ring would have been nice or a nice bit of tile, maybe a brooch to keep the kilt up, but what was found was plenty bits of old iron, metal bits from an oven, broken chards, boulders, stones.
However, there was a bit of treasure....3 old bottles and a glass top.
 They were filled with dirt but they have a residue of it stuck around the side which I can't get off. Will have to google and see what can be done to make them pristine. (would still have liked a gold ring tho!!)
However, there was a bit of treasure....3 old bottles and a glass top.

Monday, 30 May 2011
oh deary me.
The camera dried out nicely after being dropped into water and it actually took a picture BUT when I went to take some more it died on me :0( So no upto date photos for a little while which is a shame.(unless hubs can have a fiddle with it and see if it's repairable)
I have finished the little house bookmark (picture of the start a couple of blogs down) which looks quite nice and have started on a cushion cover for me bed. It has a white background with red hand stitching of hearts. Hope it matches the quilt OK.
I will leave you with this photo

The start of the polytunnel. It has come on somewhat since this picture was taken. Digging the holes for the poles was tough, the ground is filled with large stones and boulders, so they all had to be removed whilst trying to dig......took absolutely ages. Then all the holes had to be measured and re-measured to make sure they wern't squint otherwise the poles would have not squared up properly. I am still optomistic that we will get it finished before the end of the summer!!!! My coldframe is starting to look like a little jungle with all the things growing in there!
Sunday, 29 May 2011
Binding on quilt
The final finished pictures of this 'ere quilt. I did want black with small white dots as a binding, but went with what I had already in, which was red and white gingham. Do wish that I had a really good camera so the photos are clearer, but what happened was an accident I swear, it dropped into a bowl of water just after I had downloaded the photos. At the mo it's drying off I do hope it works again, cos a rubbish camera is better than no camera....right?


 Nicely folded on the chair.

With a red furry type blanket and white crochet throw.
 On the bed.
 Looks better in real life even the wonky bits!! Has the little label sewn into the back.
I have put the red furry blanket as a throw along the bottom of the bed.
Would I do another one......yes....but not just yet! I wish it was a little bit wider so there is more drape down the sides. But I can live with that.
It needs some nice cushions and/or pillows to finish it off. (I have a pair of red pj's already so I already match!!)


With a red furry type blanket and white crochet throw.


I have put the red furry blanket as a throw along the bottom of the bed.
Would I do another one......yes....but not just yet! I wish it was a little bit wider so there is more drape down the sides. But I can live with that.
It needs some nice cushions and/or pillows to finish it off. (I have a pair of red pj's already so I already match!!)
Subscribe to:
Posts (Atom)